Have you ever wanted to be a Pokémon Trainer in real life? While in the past playing out such a fantasy has relied on the imagination, Nintendo's latest game makes Pokémon a reality.
Pokémon GO has debuted on Android and iOS in electrifying fashion, quickly becoming a hot topic among gamers and on social media. This is an ambitious mobile game by Nintendo which sends you out into the real world to collect Pokémon, train them, and battle with other players at gyms by harnessing the potential of smartphones.
It's a novel idea, but the game doesn't provide a very helpful tutorial. Many players are confused on how to play the game and enjoy the best moments that it has to offer.
To help supplement the small amount of information that the game provides, we have a complete guide to Pokémon GO ready for you below.
Visit Pokestops for Rewards
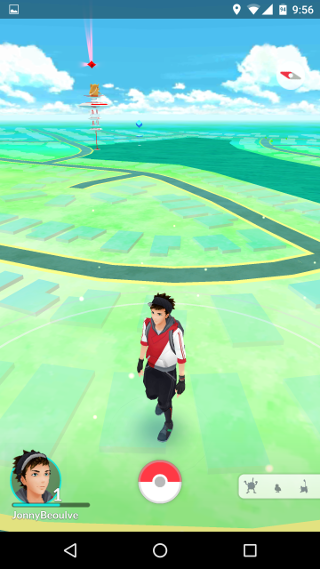
The primary activity you want to do in Pokémon GO to progress is visit Pokéstops. These are denoted by blue cubes on the map and are usually available in abundance. You can tap on the cube via your map to show an image of the specific location that the game wants you to visit.
Pokéstops come in many flavors, including building lobbies, fountains, wall art, and parks. You won't be able to claim the rewards of a Pokéstop unless you're within its vicinity, so you're asked to head out into the real world and visit these key locations in exchange for rewards.

Once you're physically at the location of the Pokéstop, the warning stating "This Pokéstop is too far away" will disappear. You can then spin the image by swiping your finger across the screen several times. Upon doing so, several items will appear. These range from items usable in battle to experience points. The experience point reward in particular is very useful for new players, as achieving level 5 is mandatory to visit a Gym (more on that later).
Once you've completed a Pokéstop, the blue cube will turn into a purple cube, confirming that its rewards have been exhausted and are no longer available. This mode lasts for several minutes before you can reap the rewards subsequent times.
ALSO READ: 8 Advanced Tips For Pokémon GO
It's important to note that Pokéstop rewards are unique to each player. If another player visits a Pokéstop, that won't prevent you from also receiving its rewards at the same time.
Catch 'Em All
Collecting Pokémon is the main highlight of Pokémon GO; it's fun, but a bit tricky.
The key with catching Pokémon is that they don't show up from far away, and instead you will need to venture out into the real world and pay attention to your map as you walk, bike, or drive around. When approaching the location of a Pokémon, a silhouette will appear nearby on your map. Once you get a bit closer to the silhouette's location, it will be replaced by a colored representation of the Pokemon on the map.

If you move close enough to the Pokémon, you will engage in an encounter with it. When this happens, you will be thrown into a face-to-face confrontation with the option to enable augmented reality (a slider on the top right), which uses your smartphone's camera to superimpose the Pokémon into a real-world image.
As explained in the tutorial, you will need to throw a Poké Ball at the Pokémon in an effort to catch it. Whether or not you succeed depends upon how accurate your throw is, which is determined by the speed and distance of your flick. This requires some finesse and is accomplished by swiping your finger upward on the screen. Some Pokémon are more difficult to capture, and the challenge is denoted by one of three colors: green, yellow, and red. Red Pokémon require immaculate aim, while green Pokémon are more forgiving of your accuracy shortcomings.
Note that Poké Balls are limited in quantity. You will start with 50 of them, which should last you a few hours. Once you run out, you will be asked to head into the Shop to spend real money on a new supply of Poké Balls.
Diversify Your Arsenal
It is important that you build a library of Pokémon that vary in type. As with other Pokémon games, every Pokémon has strengths and weaknesses. In order to defeat opponents, you will want multiple choices for what you bring into battle.

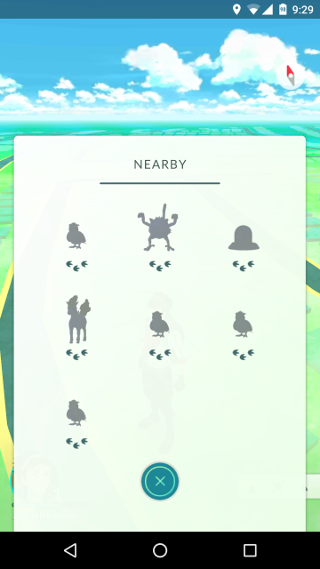
You can see which Pokémon are available within your vicinity by tapping on the grey menu item on the bottom right of the map. This will display a silhouette of all Pokémon types nearby. Once you've played for a while you may end up having everything that's available near your home. You will then be encouraged to head out a little farther, maybe to a neighboring city or to a friend's house to see if there are any new types available.
Notice that below each silhouette are between one and three footprints. These tell you how far away that Pokémon type is. While one step is within 100 meters, two steps is within 200 meters, and three steps is within 300 meters. Anything beyond that isn't shown on the Nearby menu.
Lure Pokémon
Finding Pokémon isn't an easy task, and usually entails walking around the neighborhood (which isn't a bad thing for your health). To help speed up the process of acquiring Pokémon you can use an item to lure them to you.
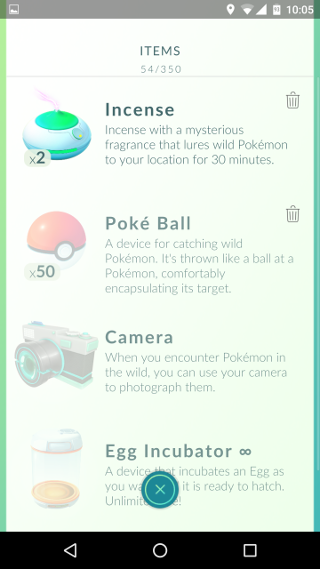
The lure item is called Incense, and you'll be granted two of them to start (more can be purchased in the Shop). To use this item, tap on the Poké Ball on the bottom middle of your screen and then tap on Items. From here you'll see how many Poké Balls are in your inventory among other items, including Incense. Tap on the incense and you'll see it hovering on your menu. Tap it again to use it.

Note that Incense only lasts 30 minutes. Since it is such a useful item, you'll want to make sure that you are available to use it for the full duration.
ALSO READ: How To Earn Free Pokécoins In the Shop
During this time Pokémon will appear nearby in great frequency. You'll need to move around, but only a small distance. They will come to you, and will consist of the selection shown in the Nearby menu. If you want to capture exotic Pokémon that aren't available within your area, you will need to head farther out into the world.
Level Up Your Pokémon
You will start with one of three Pokémon: Squirtle, Charmander, or Bulbasaur. Once you've obtained one of these Pokémon through the tutorial, you will have access to Power Up and Evolution.
To strengthen a Pokémon, tap on the Poké Ball at the center bottom of your screen. From the menu that appears, tap on Pokémon. You should see your Pokémon listed here alongside any others you have captured. Tap on one to reveal a new menu.
From the Pokémon interface you can view several pieces of valuable information. For one, you can see which abilities are available to your Pokémon when in battle. You can also see the GPS location of where you captured it. Most importantly, you have access to the Power Up and Evolve options.

Power Up is very important because it increases the power of your Pokémon. To use this feature, you will need a certain amount of Stardust and Candy. Stardust is obtained by catching Pokémon or battling others, while Pokémon-specific Candy is a bit more tricky.
Candy is specific to each Pokémon. In the case of Charmander, you will need to acquire Charmander Candy to Power Up or Evolve him. To obtain Candy you will need to capture the same type of Pokémon for which you want to Power Up or Evolve, meaning you will need duplicates of a Pokémon already in your possession. When you are ready to trade in Pokémon for Candy, visit that Pokémon's menu and tap the Transfer button on the bottom. This will release the Pokémon to the Professor to never be seen again in exchange for Candy of that Pokémon's type.
ALSO READ: The 12 Unexplained Secrets of Pokémon GO
Collecting Candy is especially important for Evolve, which requires a large sum of the valuable item. It will take you a while to collect enough Candy for an Evolve, but it's well worth it. When a Pokémon evolves it will become something much more powerful with all new abilities. If you're familiar with the Pokémon universe, then you won't be surprised to see what the evolutions are (i.e. Charmander to Charmeleon, and Charmeleon to Charizard). Many of the best Pokémon are acquired through evolution, so start collecting!
Pokémon Eggs
While at a Pokéstop you might find yourself rewarded with an egg. Eggs are a very useful item that can result in you obtaining a Pokémon not normally available in your area. They appear in the Pokémon menu under the Eggs tab, and you can hold nine at any given time.
The first thing you need to do with an Egg is walk a particular distance with your phone, which is denoted on the Egg's screen. This distance will depend upon the rarity of the Pokémon that it will reward, so some will require more than 5 kilometers of walking in order to prepare.

Once you've fulfilled the walk distance for your Egg, visit the Egg in the menu and tap Start Incubation. Select an Incubator from your menu to finalize the process. This will once again ask you to walk around, this time while the Egg hatches. After a certain amount of steps taken with your phone the Egg will hatch revealing your newly birthed Pokémon.
Head to the Gym
No, not a workout Gym, a Pokémon Gym! The main objective of Pokémon GO, besides collecting Pokémon, is to battle other players and conquer Gyms with your team.
ALSO READ: Pokémon GO Rarity Guide – Common to Legendary
Early in your adventure you will pledge allegiance to a certain team, of which there are the Yellow Team, Blue Team, and Red Team. When you visit the map you will see a variety of tall structures called Gyms. These Gyms can be one of four colors, one for each of the teams that can control them, or grey if no team has visited the Gym yet. If you see a Gym that is grey, it is advised that you visit it as soon as possible, as they are rare.

What you can do is visit these Gyms in hopes of meeting other players in real life. If the Gym you visit is controlled by your team, you will likely find members of your team at the location defending it. It is important that Gyms under your possession are defended by members of your team, as they serve as an obstacle between opposing teams coming and claiming the spot.
What will happen if an enemy team member visits the location is they will be tasked with defeating multiple trainers before facing the Gym Leader. For each victory the Prestige level of the gym will be reduced. Once Prestige reaches zero, an opposing team can claim the Gym.
Gyms are very competitive and require that you have powerful Pokémon to compete. You'll want to spend some time visiting Pokéstops and leveling up Pokémon before heading to one. One of the easiest way to see if you're ready is to check the CP of your Pokémon, which serves as a barometer of its power level. Compare this number to what Pokémon are at the Gym to get an idea of how you fare.
Final Tips
– Become familiar with Pokémon types before you battle. Every Pokémon has strengths and weaknesses that can be exploited to give you an edge.
– Visit Pokéstops regularly for easy rewards. These are much more simple than the other avenues of earning rewards in the game, especially early on.
– Name your Pokémon. You can click the pencil icon next to the Pokémon's name in the Pokémon menu to change it at any time. Other players will see this name, too.
– You can dodge in battle. Battles are real-time and by swiping left or right you can dodge attacks.
– Leave the app open. Yes, this will drain your battery life, but the game won't track your steps or nearby Pokémon when it's closed.
– Provide the app enough time to load the area that you're in. Although the app is constantly pinging for your location and nearby objects, sometimes there is a delay that can make it appear that there is nothing nearby when there actually is.
– Join the same Team as your friends. This will allow you to play alongside people you are familiar with and learn together.
– Capturing multiple Pokémon of the same kind isn't a bad thing. Read the "Level Up Your Pokemon" section for more on this.
– Click the green shield icon at the top-right of the Shop menu for a free reward once per day. This requires that you have a Pokémon guarding a Gym.


