
The difficulty in Destiny 2 Shadowkeep‘s campaign spikes with The Scarlet Keep strike. With a full fireteam, it’s not too difficult, but if you’re trying to do The Scarlet Keep strike solo, it can be quite the challenge. Specifically, the boss of the strike, Hashladun, can be almost impossible if you’re by yourself, at least at the power level you’re likely at when the strike becomes available.
Fortunately, I’ve taken on The Scarlet Keep strike by my lonesome in Destiny 2 Shadowkeep and lived to tell the tale. I’ll give you the tips you need on what build to use and the best way to beat Hashladun solo.
Preparing to run The Scarlet Keep strike solo in Destiny 2 Shadowkeep

You’ll likely be around power level 790 when Eris Morn sends you on The Scarlet Keep strike. Up to this point, nothing Shadowkeep has thrown at you has been too tough. You probably just took down Omnigul without breaking a sweat, and you’re on top of the world (or at least the Moon). Well, get ready to have your ego deflated a little.
The Scarlet Keep strike is, well, a strike. That means its geared towards three guardians running it. However, Bungie has inexplicably still not added matchmaking to anything other than the Vanguard playlist. So, if you don’t have any friends online and you don’t want to use a Looking for Group tool that adds the functionality that should already be in the game, you’re stuck running The Scarlet Keep solo if you want to progress in the Shadowkeep campaign.
It’s entirely possible that you can beat The Scarlet Keep at 790 power. In fact, making it to Hashladun isn’t too difficult at that level. However, do yourself a favor and get to power level 820 or so. It won’t take long. You can wager some motes in Gambit, or just roam around doing whatever. The game is going to make it rain better equipment on you, and before long, you’ll hit 820-830.
Once you’re at power level 820-830, you’ll have an easier time all around with The Scarlet Keep. Crowd control is a big concern when you’re riding solo in this strike, and having that little extra power to mow down mobs makes a big difference.
The Scarlet Keep solo skills and gear
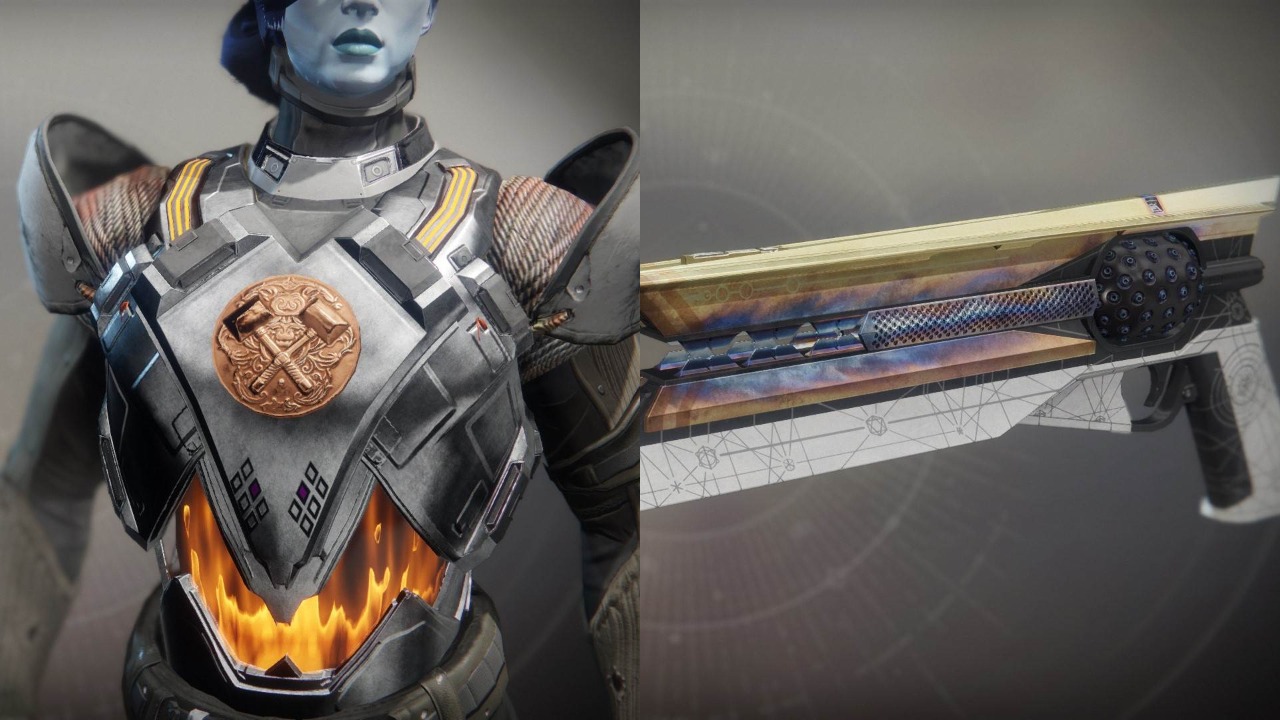
So, now you’re ready to take on The Scarlet Keep strike alone in Destiny 2 Shadowkeep. I ran with a Titan, and my strategy is straightforward. If you’ve played through the previous campaigns, you should already have access to the gear required. My core equipment for the strike was:
- The Sunshot Exotic Hand Cannon
- Any auto rifle
- The Hallowfire Heart Exotic Titan Chest Armor
More than likely, the Hallowfire Heart isn’t necessary, but I run Solar, and I like the ability regen. The main linchpin here is the Sunshot. You’re going to run into an absolute ton of Hive Acolytes and Thralls, and one good shot from the Sunshot can take out whole swaths of them. Each enemy you kill with Sunshot explodes, damaging nearby enemies, and it’s essential to solving the crowd control issues you’ll face when taking on Hashladun.
The auto rifle, ironically, is for Hashladun herself. The Sunshot’s fire rate is too slow to make it worth using on her. Since she likes to float around a ton and you’ll need to keep moving throughout the fight, you’re best off just using whatever auto rifle you have. A submachine gun could work, but since you’ll be firing on Hashladun at various ranges, its reach might be too short to be effective throughout the fight.
As for heavy weapons, just bring whatever. Note that Hashladun does float around the arena at a pretty quick clip, so you’ll want to be sure of your aim before you let loose with your more powerful ordinance.
How to take on The Scarlet Keep solo in Destiny 2 Shadowkeep
For the most part, this raid isn’t really too bad. There are a few tricky parts besides Hashladun that I’ll explain below.
How to get past the first no-respawn point
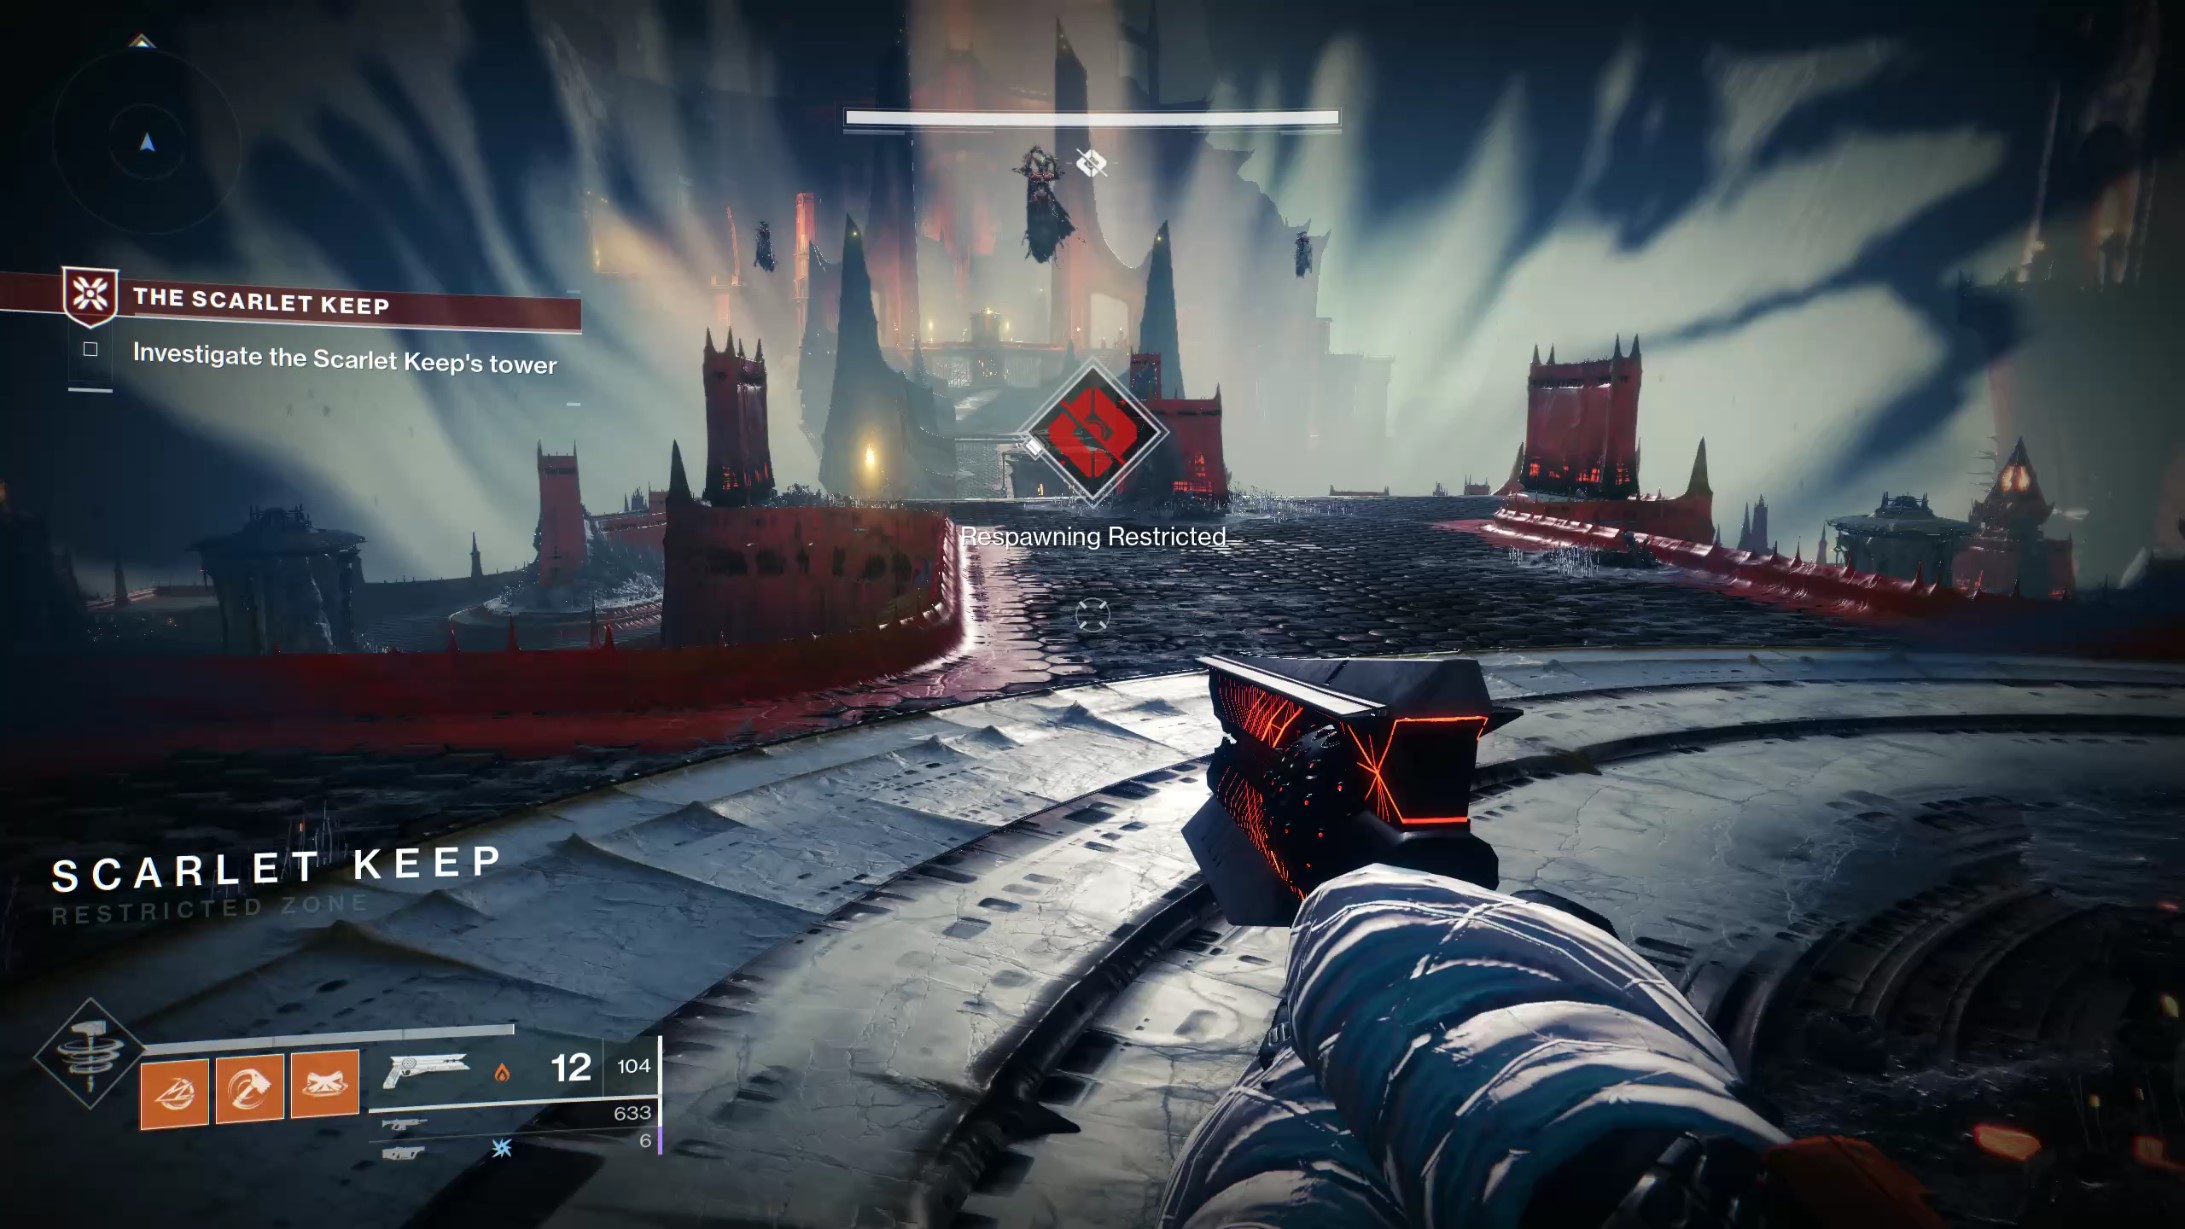
About halfway through The Scarlet Keep, you’ll enter a room where you’ll get the dreaded no-respawns allowed notification. Hashladun has cast a spell preventing you from resurrecting and blocking your way. To break them, you’ll have to kill a wizard on both the right and left sides of the area. When you kill one of them, a Void Charge will drop at a nearby pedestal, and you’ll have to carry it back to the central area and throw it in another stand.
This room isn’t too hard until you’re bringing the second Void Charge back. When you make it back to the center of the area, Cursed Thralls will spawn near the pedestal you need to place the charge in. If you were with a fireteam, this wouldn’t be a big deal. Someone could shoot one of the Thralls, and they’d all explode, and everyone would be happy. Since you’re solo, you’ll need to kite them away from the pedestal, or they will kill you when you’re trying to insert the charge. Just lead them away and sprint back over to where you need to go and set the Void Charge. If you’re feeling particularly adventurous, you can dip in close enough to the Thralls to get them to detonate, which is a little easier to do in the third-person the game puts you in while carrying the charge.
Once you insert both Void Charges, the spell is broken, and you can continue on.
How to get the elevator moving
Near the end of The Scarlet Keep, you’ll find yourself on an elevator that slowly takes you to the top of the tower. It’ll stop two times, and you’ll have to fight Hive Wizards to continue. The first stop pits you against one wizard, while the second has you take on two.
When you defeat the wizards, the waypoint will lead you back to the elevator. What it doesn’t make clear though is how to start it again. You have to blast the crystal hovering over the lift for it to proceed on its journey upward. Pretty easy when you think about it, but easy to overlook in the heat of the moment.
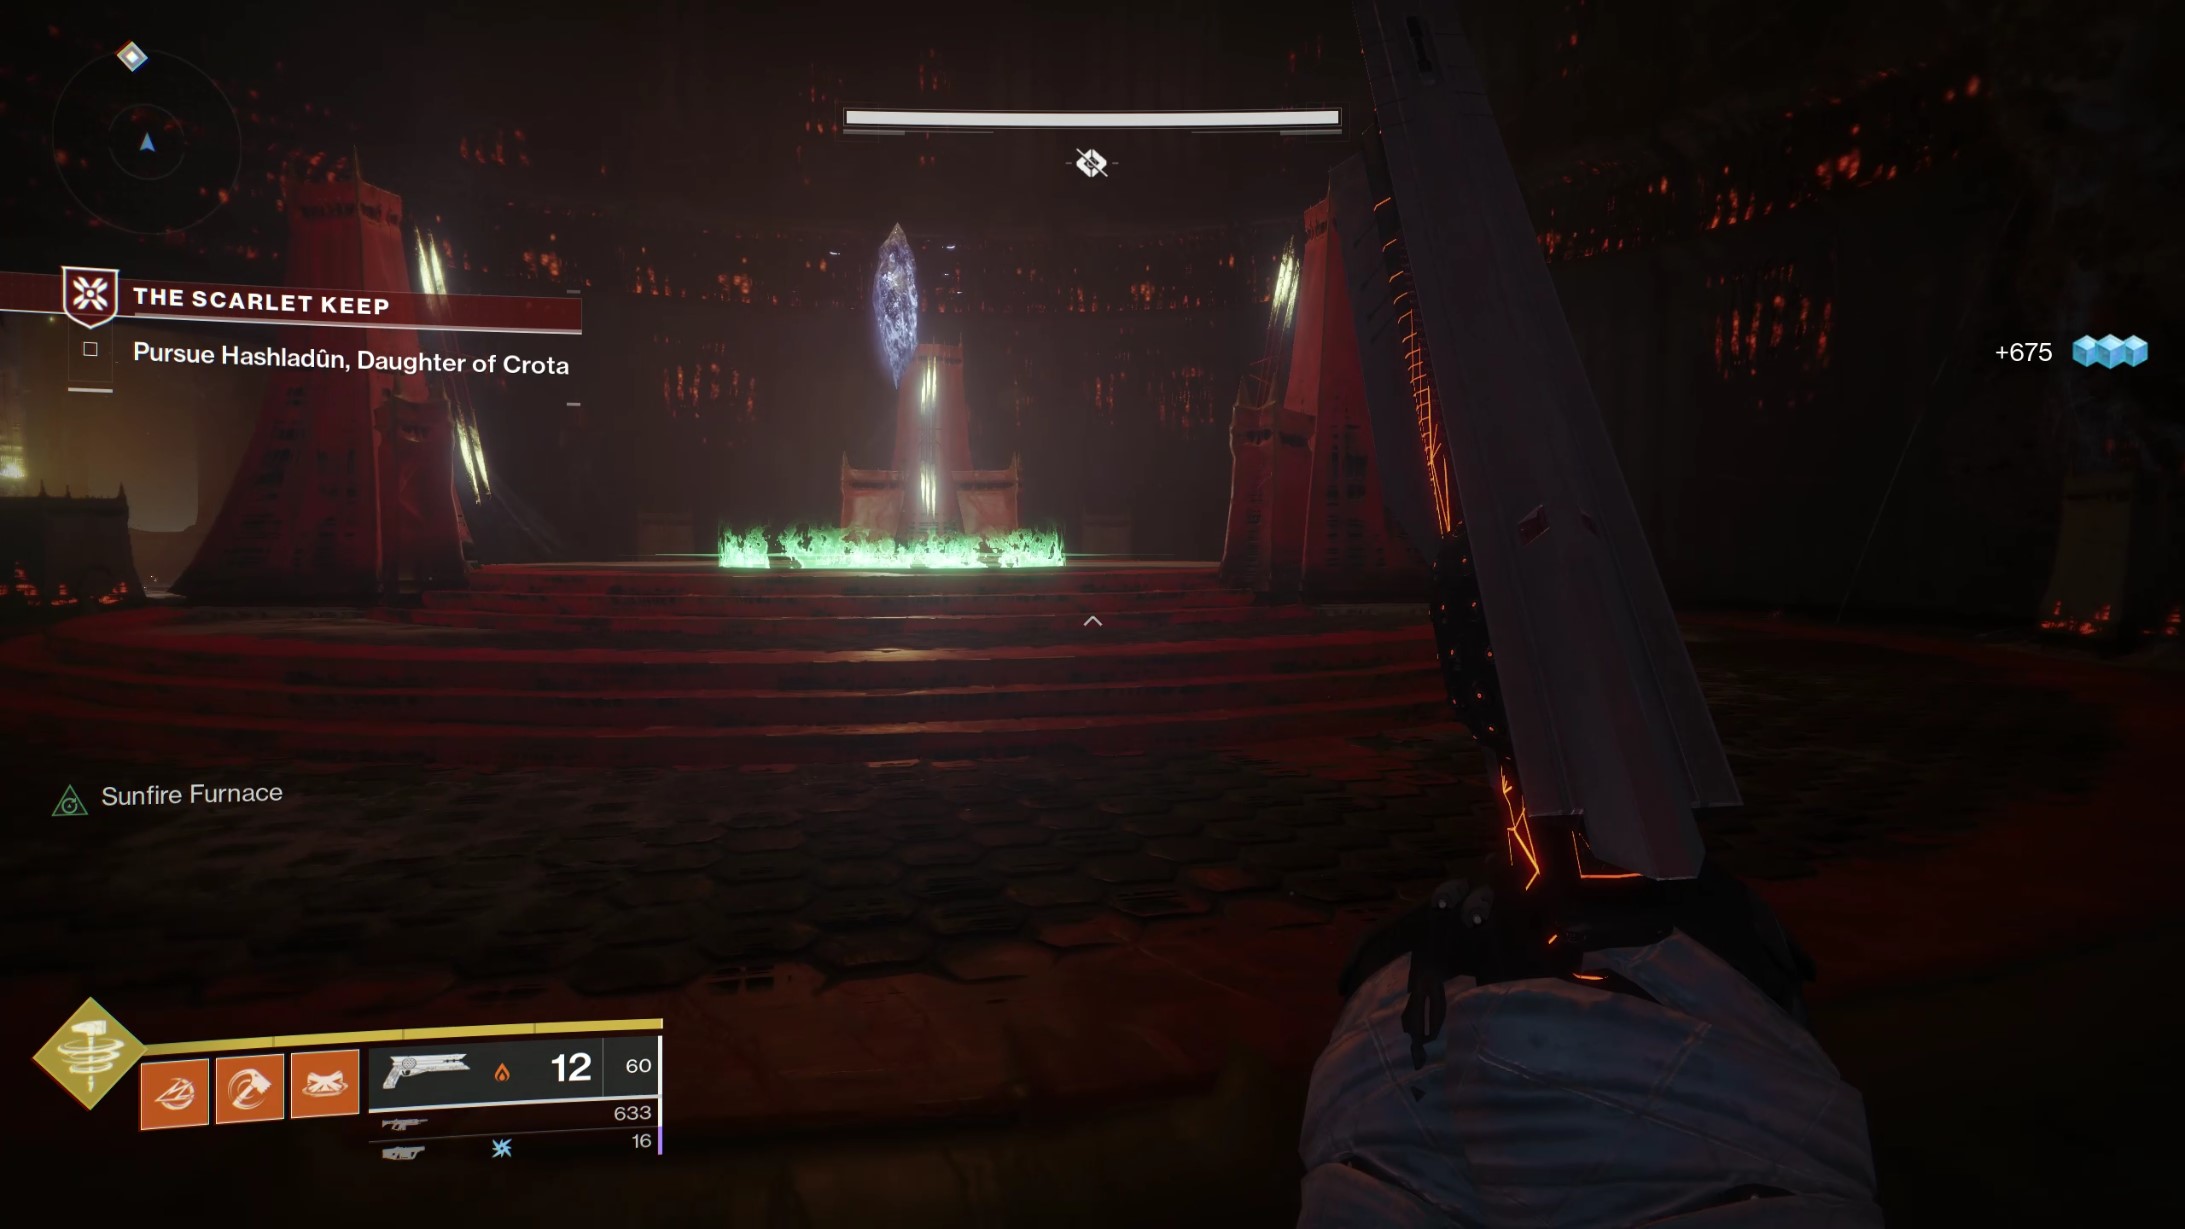
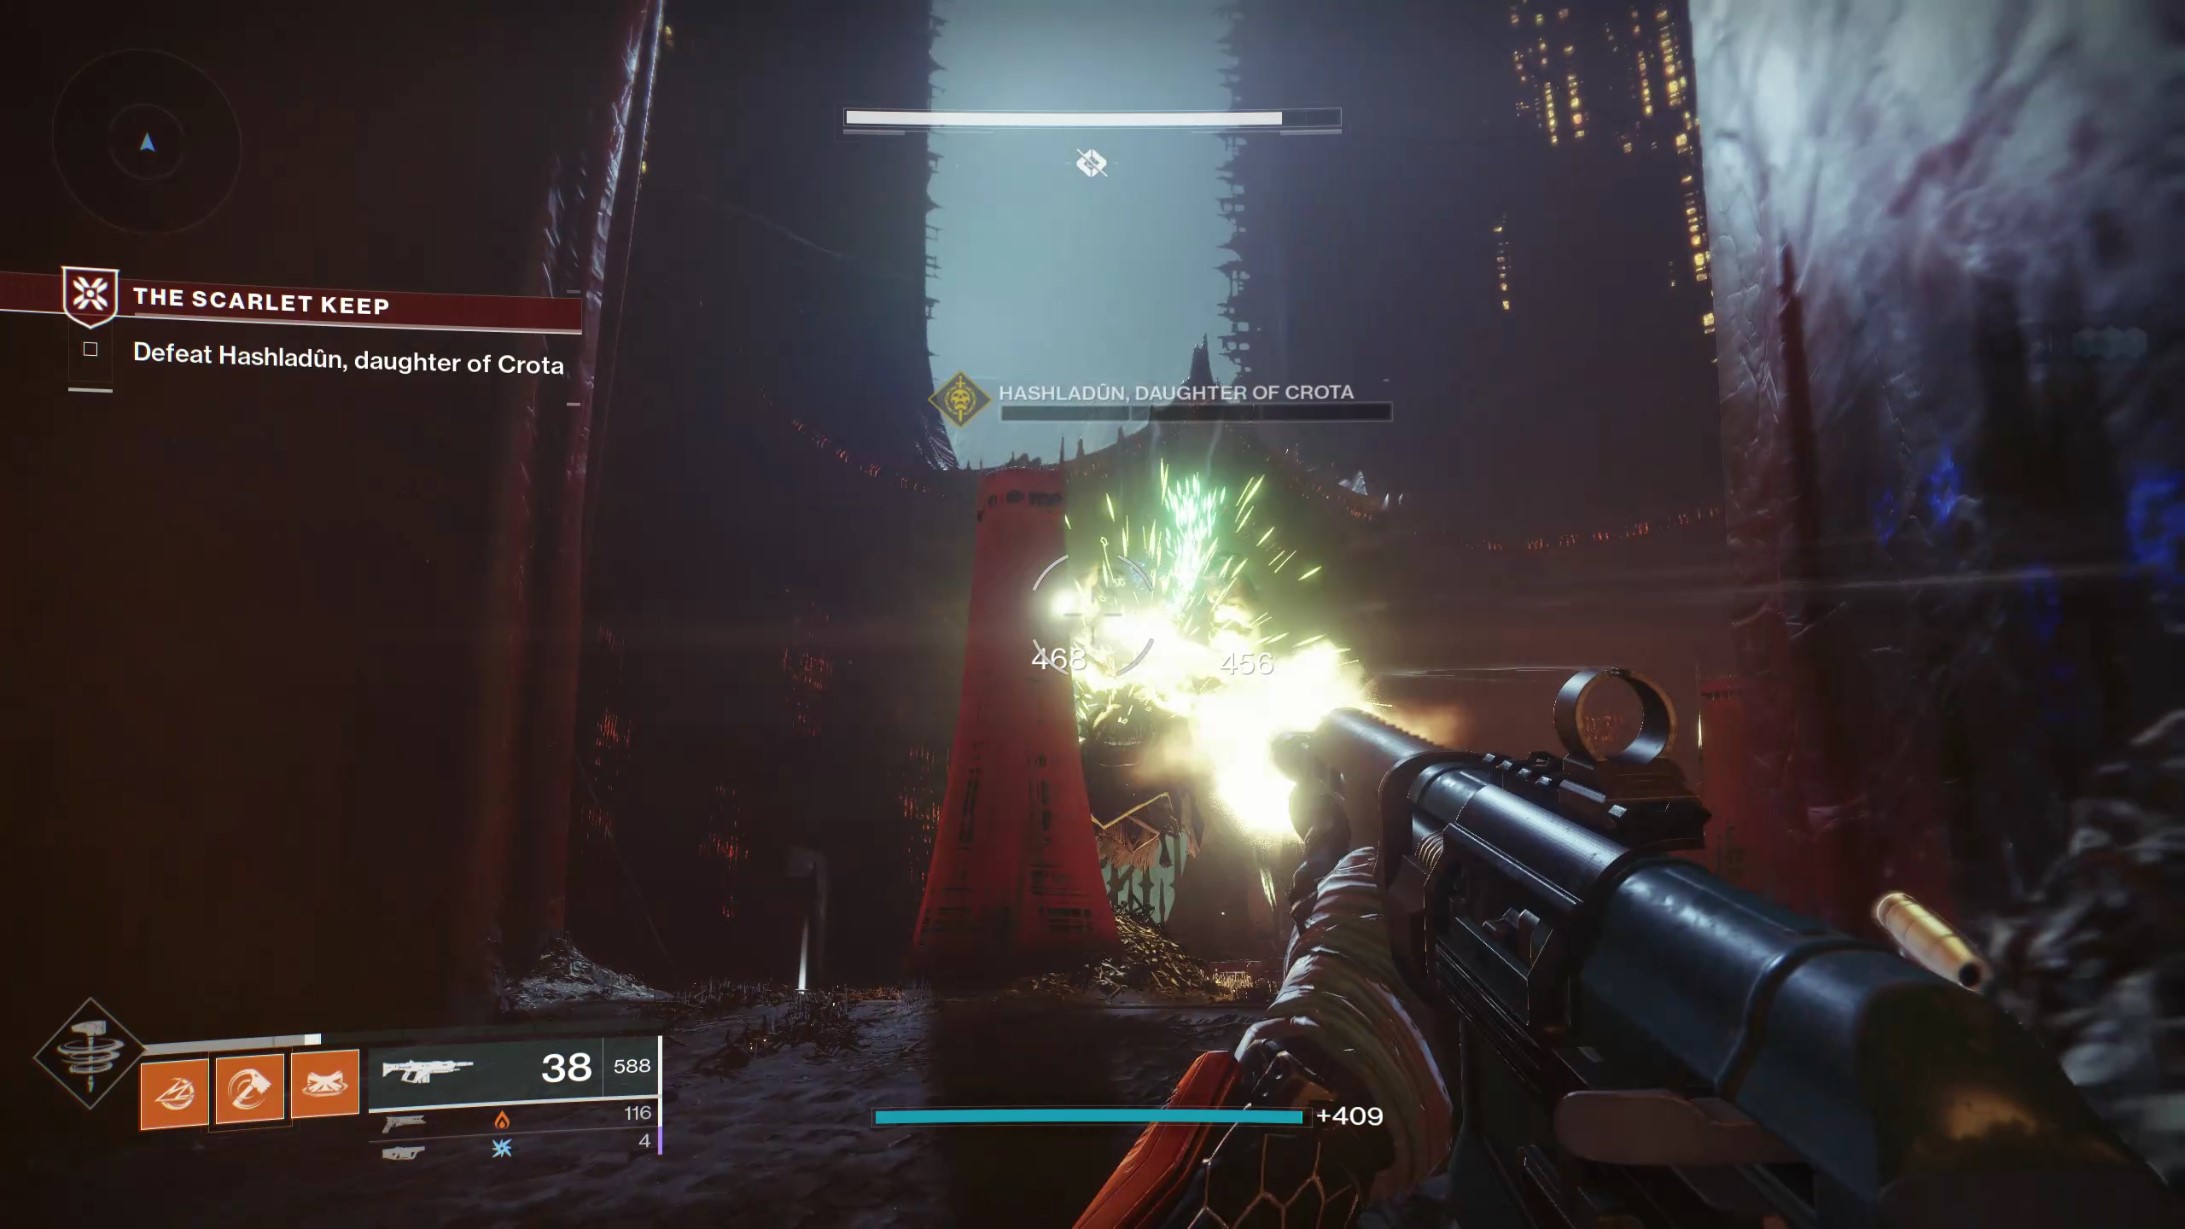
How to defeat Hashladun solo in the Destiny 2 The Scarlet Keep strike

Once you get to the top of the elevator, you’ll find Hashladun behind a locked gate flanked by two Hive Wizards. Each time I faced them, their shields were Solar, so just plug each of them a couple of times with the Sunshot, and they’ll go down. Once they’re dead, Hashladun will open the gate, and the boss fight is on!
This is the part of The Scarlet Keep strike that’s very tough to do solo. Hashladun herself isn’t anything special. Her main attack is a steady stream of pulses, much like an Ogre or Shrieker. However, there are two things in this fight that will kill you very dead very quickly since you don’t have any other guardians watching your back.
The first threat is Hashladun’s second attack. Every once in awhile, she’ll make the ground glow green in a circle below you. When this happens, you have around a second or two to get out of the circle before it explodes. If you’re caught in the ring, it’ll do a fair bit of damage, but more dangerously, it launches you into the air. Since the boss arena is open on one side, you can get caught by the blast and pushed over the edge to instant death. The counter to this attack is to keep moving throughout the fight and try your best to stay in the inner circle where the pillars can catch you if you get blasted into the air.
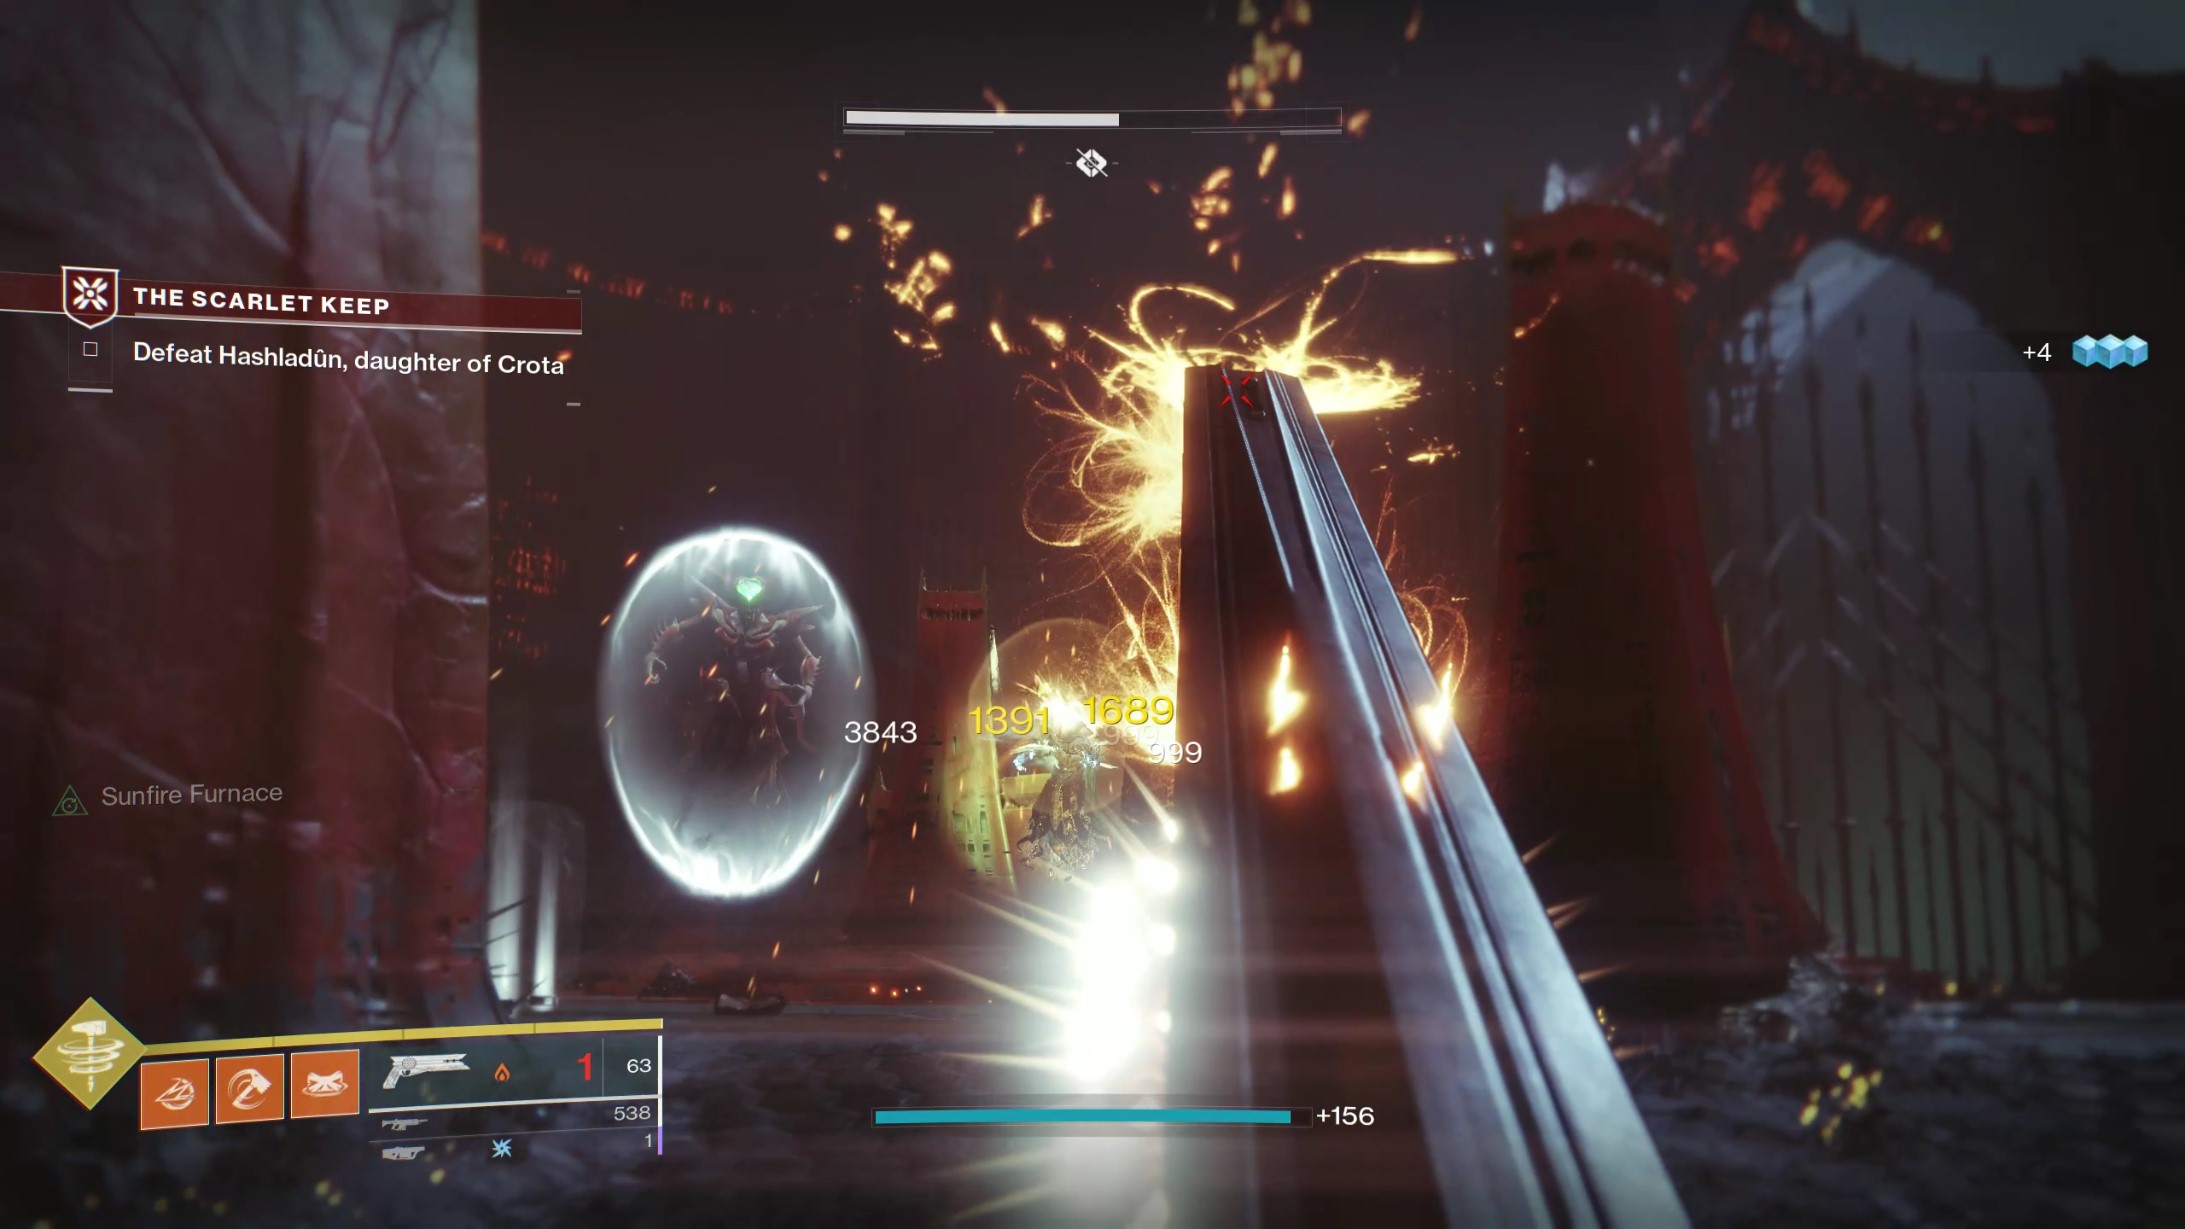
The second, and most pressing threat, is Hashladun goon squads. Around every eighth-quarter of her health bar, Hashladun will summon a mixture of Thralls, Acolytes, and Knights into the arena. Again, if you were running with a fireteam, crowd control here wouldn’t be a big deal. However, running against Hashladun solo means you’ll have to worry about her and her underlings.
Taking care of the regular enemies during this fight is where the Sunshot comes in. Just like in your run-up to the boss, the Sunshot can take out multiple weaker foes in one shot. If you can catch the Thralls and Acolytes coming out of their spawns, before they disperse through the arena, you can usually kill the majority of them before they get near you with just a few rounds. The Knights are a bit tougher to take down, but you can dodge behind the pillars and snipe at them. When she’s at two-thirds health, she’ll spawn two wizards that cast a shield around her. You’ll have to take them down to lower the shield and make her vulnerable again. At one-third she spawns two Fissure Ogres that work with the same concept. Take them down and her shield will be gone again.
Beating Hashladun is mostly a battle of attrition, and you’re best off using your auto rifle and heavy weapon against her. She’s quick, and the steady stream of projectiles she fires can wear you down, but as long as you weave in and out of the pillars, you can avoid the majority of them. Even the area of effect attack that can throw you isn’t hard to avoid as long as you keep moving. She’ll never anticipate your route, and if you’re not standing still, she’ll just continuously attack where you were instead of where you’re going. Just shoot at her head and take out her mooks with the Sunshot as necessary. Supers and abilities are just bonuses in this fight, and you can fit them in with your strategy where you think they’ll work. If you’re using the Hallowfire Heart, your abilities regenerate faster when your super is charged, so you might want to hold onto it until you’re sure you can do the maximum amount of damage with it.
By following the guide above, you’ll be able to take down Hashladun solo and have the honor of saying you conquered The Scarlet Keep alone.


