Nintendo’s second mobile game, Fire Emblem Heroes, gives you a barebones explanation of how fighting works in the game, such as the red-green-blue triangle. Despite being a mobile game, there is a lot of depth to be found in combat and the game’s brief tutorial leaves out a lot of important info you have to figure out on your own through trial and error. We are here to alleviate some of that with a few tips to get you started.
Taking Control
Be careful with auto-battle. During battle, accessing the menu in the bottom left corner will open up a few important options. Of those, there is auto-battle. In quick mobile fashion, the game will fight through the whole map on its own and attempt to win it for you. Auto-battle should never be relied on frequently. Yes, this is a mobile game, but certainly not one that is easy nonsense.
Fire Emblem Heroes does retain the strategic allure of the main series, so there are times when the level/skill between your team and the enemy team will be so close that computer AI simply can’t substitute for good ole fashioned human strategizing. However, there are some use for the auto-battle feature. Whether through summoning new heroes or upgrading a team member to a higher star rating, there will come a point where you have characters that are at a lower level than you need them to be. This requires grinding, and setting up a low-level team and having them auto-battle through some of the easier missions is the best way to utilize the feature.
Making Gains
That’s not the only way to level up characters, though. Shards and crystals that are collected through missions can be used for instantly leveling up characters to catch up to your more established team by going to allies, then level up, and selecting which hero you want to level up. You are able to level them up all the way to level 40 if you so choose, but it quickly becomes a very costly method.
A much cheaper, but longer method is through the Training Tower. Composed of different stratums with increasing difficulty, each floor of the tower is unlocked as you progress through the story. Each completion of a training mission randomizes the tower, meaning one moment you might be up against a level nine team consisting of an archer, swordsman, axeman, and blue mage, and the next be a level ten team of nothing but four blue mages. This requires attention to see what your team makeup needs to be.
The Battlefield
Now, onto the individual battles themselves. Fire Emblem Heroes takes place on a eight by six grid map. Despite being a small map, ranged characters can be rather overpowered. If you are overwhelmed by some more powerful or beefy enemies, you can use obstructions like walls or terrain to allow for uncontested shot after shot until the foe finally falls.
Learn how your character moves. Some characters can move only one square at a time, while others can be move upwards of three or four. Flying heroes are able to cross terrain that grounded heroes are not. Ranged characters, like an archer or mage, also require being adjacent or one space away from a target to attack so don’t let yourself become cornered and unable to fight.
Know when to play defense. Being a mobile game and taking place on a single screen, it is easy to have the stigma of attack, attack, attack. This mentality does work at first, but will certainly end in a game over in the late-game missions. The danger area feature in the bottom left corner of the screen will become your best friend. A simple press of it will show a shaded area of the map and if your team is standing in a red square, they are able to be attacked by the enemy. Of course, the danger becomes more imminent the closer you are to the enemy.
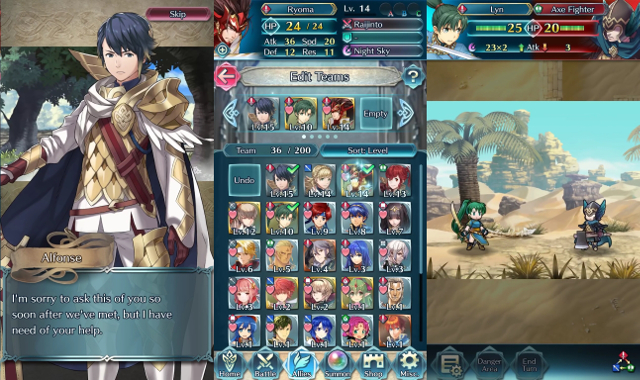
So, defense is key. One of the smartest moves you can make at the beginning of the fight is to not move at all. Instead, let the enemy come toward you until you are in their danger area and they in yours. This allows you to get the first attack, something that can make or break the battle.
Finally, here is a mini walkthrough for the first three chapters of Fire Emblem Heroes in case you are having trouble.
Mini Walkthrough
Prologue- World of Zenith Part 1
Stamina Cost: Two
Enemy: Level Two Swordsman, Lancer, Axeman
Tip: Don’t spread out your forces too thinly. Keep them together in at least pairs and take out enemies one by one. Remember that blue beats the red swordsman, green beats the blue lancer, and red beats the green axeman.
Prologue Part 2
Stamina Cost: Two
Enemy: Level Two Swordsman, Lancer, Axeman, Healer
Tips: Watch out for swordsman, lancer, and axeman that can fly across mountains and other terrain quickly. Destroy walls to access more of the map. Take out Maria the staff wielder as soon as possible, as she can and will heal her allies and prolong the battle.
Prologue Part 3
Stamina Cost: Two
Enemy: Level Three Swordsmen (two), Archer, Healer
Tips: Have a blue character for sure to combat against the two red swordsmen. Watch out for the unbreakable walls so that you don’t get trapped with nowhere to run. Be weary of the archer that can shoot across walls and from far away. Take him and the healer out as soon as possible, especially if you have a flying hero as they are weak to archers.
Chapter 1- World of Mystery Part 1
Stamina Cost: Two
Enemy: Level One Swordsmen (two), Lancer
Tips: Very straightforward and easy fight. Watch out for Jagen, who can move far and has more health and attack than the others.
Chapter 1-2
Stamina Cost: Two
Enemy: Level Two Swordsman, Axeman, Archer
Tips: Green characters are least helpful for your team on this map. Split up into pairs and go after the enemies on the two bridges at the same time. Watch out for the archer who can attack you across the river.
Chapter 1-3
Stamina Cost: Two
Enemy: Level Two Blue Mage, Green Mage, Healer
Tips: Keep control of the bridge and let the enemy come to you. Take out the healer quickly while getting close to the ranged mages so they cannot attack you from far away or use your own ranged characters to take them out.
Chapter 1-4
Stamina Cost: Two
Enemy: Level Three Swordsman, Lancers (two), Archer
Tips: Having a green character will be a big help against the two lancers. Watch out for flying lancer and archer that will make a beeline from the start towards your team and take them out first. Stick together and control the centralish corridor between the bodies of water.
Chapter 1-5
Stamina Cost: Two
Enemy: Level Four Swordsmen (two), Archer, Green Mage
Tips: First real boss battle. Avoid the urge to split up team and go the two separate directions. Instead, stay together and go left. Ranged character is useful here as their ranged teammate will try to attack you as you move towards them no matter which way you go.
Chapter 2- World of Conquest Part 1
Stamina Cost: Two
Enemy: Level Three Swordsman, Axeman, Red Mage, Healer
Tips: If you have blue character, send them north to duel against Xander alone. Have the rest go against the three enemies to the west. Otherwise, stand your ground and let the enemy come to you. Watch out for flying axeman that can fly across the water and attack.
Chapter 2-2
Stamina Cost: Two
Enemy: Level Four Lancer, Axeman, Healer (two)
Tips: Two options here. First, take control of the entrance to the building in group of four and take out lancer and axeman first before the healers arrive. Second option is to attack weak walls and go through them to take out healers first before dealing with the others. Be quick with this one as the healers can hide behind the other two and prolong this battle to wear you down.
Chapter 2-3
Stamina Cost: Two
Enemy: Level Five Archer, Red Mage (two), Blue Mage
Tips: Fast or ranged characters are key here, due to an entirely ranged team. Split up into two teams and go left and right. Preferably, have a blue or neutral character go left to fight against the red mage. Be careful, as melee characters are at a significant disadvantage here.
Chapter 2-4
Stamina Cost: Two
Enemy: Level Five Swordsman, Lancer, Axeman (two)
Tips: Stay near bridges as a group. Have one person on the right bridge, preferably ranged or blue, to fight Selena. Have rest of the group with a red character be ready to fight the three remaining enemies that will fly across the lava in just two turns and attack your team.
Chapter 2-5
Stamina Cost: Three
Enemy: Level Six Swordsmen (two), Lancer, Axemen
Tips: Straightforward fight but placement is key. The enemy will always be in the order of Peri the blue lancer, Xander the red boss, Laslow the red swordsman, and the green axeman. Therefore, the placement of your team is very important as well. The optimal team would be (in this order) green, blue, blue, and red. Wait out the first turn and let the enemy advance towards you. This allows you to get the first hit. Be careful of the powerful and bulky Xander, and Laslow who is able to increase his teammate’s speed, which in turn could allow them to attack twice in a row if higher than your hero’s speed.
Chapter 3- World of Binding Part 1
Stamina Cost: Two
Enemy: Level Four Swordsman (two), Lancer, Archer
Tips: Very easy fight compared to last one. Watch out for archer shooting across the river to the left. Stick together and go right, and fight as a group.
Chapter 3-2
Stamina Cost: Three
Enemy: Level Five Lancer (two), Green Mage, Healer
Tips: Split into pairs, with one going on the north bridge and the other to the south bridges. A green on each team would be best, but if not, a ranged character to the north to take out the healer fast works as well. Watch out for both healer and green mage as they tend to hide behind the lancers, which can be dangerous in the long run.
Chapter 3-3
Stamina Cost: Three
Enemy: Level Six Axeman, Red Mage (two), Green Fire-breather
Tips: Your leader will spawn north a bit so it is best to have the leader be a red character to go up against the fire-breathing dragon enemy or else she will sneak up behind you. They must also watch out for red mage that can attack from across the mountain. Have the rest of the team go right and take on the other enemies. Prioritize the mages over the bulky axeman.
Chapter 3-4
Stamina Cost: Four
Enemy: Level Seven Swordsman, Lancer, Axemen, Archer
Tips: While it may seem like it's best to divide up forces for this one, it is better to keep everyone together and focus first on the left side of the mountains. This is because of the archer and his long range, as well as the fact that no matter where you go, the flying lancer can go there. Save the swordsman for last and focus on taking out the left side and lancer first. Other than that, this isn't too difficult of a battle.
Chapter 3-5
Stamina Cost: Four
Enemy: Level Eight Swordsman, Lancer, Red Mage, Healer
Tips: Without a flying hero, this map limits a lot of what you can do movement-wise. Because of this, your best bet is to play it defensively. Strangely enough, the AI gets smarter in this battle and won't move until you do. So, move up your strongest player into the danger area and have them lead the group through the single narrow corridor. It is best to focus on the troubadour healer and Gwendolyn first. Gwendolyn the lancer is the beefiest enemy, yet, with a whopping level 25 health, and pretty good attack and defense. She will be your biggest problem here, so taking her out with ranged or a green character is optimal, then the rest is typical fare.
Questions? Comments? Have your own tips to share? Let us know in the comments below!
Check Out More Fire Emblem Heroes Coverage On GameRevolution: