One of the great things about eARC is that it can pass uncompressed 5.1 or 7.1 PCM surround sound through TVs through HDMI. That means no more workarounds are needed to connect your PC directly to your TV and still get the best audio possible from your soundbar or A/V receiver. Unfortunately, getting a PC to work with eARC can be a significant hassle given the feature’s relative newness.
How to pass PCM surround sound audio through eARC on a PC
There aren’t a ton of TV models on the market that support eARC yet. However, one of them is considered the best gaming TVs available, the LG CX. When purchasing my LG CX, I was extremely excited to use eARC to pass PCM audio from my PC to my audio receiver. So, imagine my disappointment when I connected my computer to the CX and found it would only output stereo sound.
Fortunately, there’s no hardware barrier keeping your PC from passing uncompressed surround sound through eARC. As long as your GPU supports HDMI 2.0, you should be able to output lossless 5.1 or 7.1 surround to your TV and pass it through to a receiver.
The first thing you need to do is to make sure your TV has eARC enabled and is set to pass through. This guide gives instructions for the LG CX series, and other models that support eARC should require similar steps.
Once eARC is enabled on your TV, you need to fix the issue preventing your computer from outputting surround sound. The problem that you’re facing is that for some reason, your PC isn’t passed the correct EDID data from the TV. This is an issue that’s persisted across multiple makes and models of television, and I’m not entirely where the fault lies. However, it’s a relatively easy fix.
To enable surround sound through eARC on your PC, take these steps:
- Download Custom Resolution Utility (CRU).
- Unzip and start the program.
- Make sure your TV is selected in the dropdown in the upper left corner of the program screen.
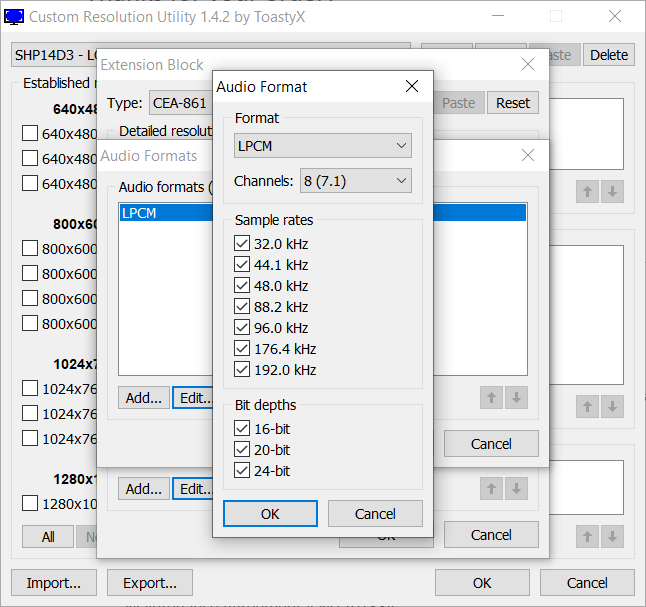
- In the lower right part of CRU, you’ll see “Extension blocks (2 slots left).” Click on the line that says, “CEA-861: 1 detailed resolution, 9 data blocks (HDMI 2.0).”
- Click “Edit…”
- In the window that opens, under “Data blocks,” click on “Audio formats,” then click “Edit…”
- In the Audio Formats window, click on “LPCM,” and then, “Edit….”
- Under “Channels,” click the dropdown and select “8 (7.1).”
- Click “OK” on every window until the program closes.
- Restart your computer.
Now, you can configure your computer to use PCM surround sound by doing the following:
- Right-click on your sound settings in the taskbar and select “Open Sound settings.”
- In this window, under Related Settings, click “Sound Control Panel.”
- Right-click on the proper device under “Playback,” (mine is LG TV SSCR), and click “Configure.”
- Select the audio configuration you use to use, and click next until the window closes.
Now, you should see that your A/V receiver or soundbar is outputting surround sound. My Marantz receiver says “Multi In” when multichannel PCM is being input, but your model may say something different.


